All Stories
Showing posts with label Blogger. Show all posts

Thursday, 15 May 2014

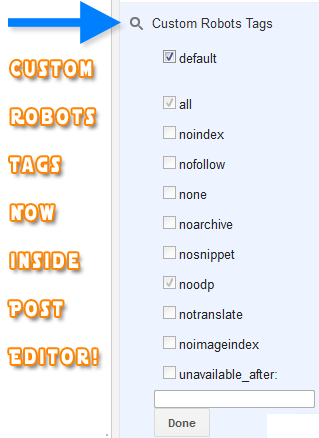
Settings For "Custom Robots Tags" Inside Post Editor

custom robots tags in blogger

Blogger just added Custom robots header tags to post editor. One of the features of search preferences was robots.txt and Robots tags which could be set only for homepage, archives, posts and pages. But now you can edit these settings even for individual posts and pages right from BlogSpot post editor. Unlike Meta Description, Custom Robots Header tags are not visible and are not shown if you try to check  it by viewing the browser source file for your blog. You will only see Meta Description if you have added the dynamic code. We will learn today where are robots tags added in your templates and how can you view them. Lets first find and locate these Robots header tags.


Why Can't You See Robots Tags?

If you have applied custom robots flags by following the tutorial for Search Preferences, then you would have observed that you don't see any flag appearing when you view the source file of your blog. This is because that these flags can be seen only in the HTTP header fields. Google now accepts robots tags which are directly added to the Headers of the HTML Page. To keep things simple, do this:
  1. After applying custom robots flags and activating it, visit your blog in Chrome
  2. In chrome go to this path: Tools > Developer Tools > Networks     (In Firefox it is : Tools > Web Developers > Web Console > Net )
  3. You will see several column fields as shown in the image below:
developers tools
   4. At the top-left you will find URL of your blog. If you don't see any data then simply refresh your blog without closing the Developers Tools window, you will find information appearing.
   5. Click your blog URL and you will see  two sections at your right. Request Headers andResponse Headers.
   x-robots-tag for blogger
    6.   Under the Response Headers you will see an X-Robots-Tag header tag. This tag resembles the flags that you had set for your homepage. In my case I have set the custom robots tags for your homepage as All and noodp therefore it is appearing as X-Robots-Tag: all,noodp
The tags for archives,search pages, posts and pages should look similar to the above one but for some reasons I could locate the tags for homepage alone.

Settings For Custom Robots Tags Headers

To see header tags in post header you must first activate the custom headers. If you have not yet activated then follow these steps. Go to Settings | Search Preferences, click Edit next to "Custom robots header tags," and select Yes. Activated Successfully!
Now you must learn when should you use them. Using them correctly can help you rank better and using them at wrong scenarios can surely play the opposite.
TagMeaning
allThere are no restrictions for indexing or serving. This is default for all pages
noindexDo not show this page in search results and do not show a "Cached" link in search results.
nofollowDo not follow the links on this page
noneEquivalent to noindex, nofollow
noarchiveDo not show a "Cached" link in search results.
nosnippetDo not show a snippet in the search results for this page
noodpDo not use metadata from the Open Directory project (DMOZ) for titles or snippets shown for this page.
notranslateDo not offer translation of this page in other languages in search results.
noimageindexDo not index images on this page.
unavailable_after: [RFC-850 date/time]Do not show this page in search results after the specified date/time. The date/time must be specified in the RFC 850 format. Example: 17 May 2012 15:00:00 PST
The only tags which you should focus on are noimageindex, noindex and nofollow. Rest are just not required for a small scale blog. All of these tags are useful when you have a corporate blog or website with thousands of pages or even millions of pages. They help to control how search engines may crawl your content.
When to use noimageindex ?
If you are sharing personal or family pictures on any of your posts or page then may be you would prefer not to make those pictures public and keep them limited to readers reach only. In such case you may check this option and robots will be directed not to index the pics or images used inside the post.
When to use noindex?
Any page or post that you want to hide from robots and visitors can be tagged as noindex. Visitors wont be able to discover that page via search engines or may be even with the Google Custom Search Engine.
You can even noindex post or pages that you think will effect your search ranking. Google Panda Effects all those blogs which publishes low quality content. If you feel any of your post is just for entertainment purpose and does not relate to your niche then you can simply choose the noindex option from Header Tags.
When to use nofollow?
If you are creating a useful directory of 100 or more links that all point to some external websites and you don't want to pass your PageRank juice to them then you can choose the nofollow header tag.
If you are looking for when to nofollow links then read this tutorial:

Posted at Thursday, May 15, 2014 |  by Unknown

Remove all Structured Data Errors on your Blogs!


Structured Data Errors improvement chartThis post is a confirmation to prove that the unique SEO method that we published last month to fix hatom errors has done us wonders and have solved all errors on webmasters for both our network blogs and our clients. Microformat markup errors are amongst the most complicated errors and fortunately we managed to find a fix for blogger blogs. We are now moving towards solving hatom errors in Wordpress blogs and will release that tutorial pretty soon. Please check below the screenshots to see the amazing drop in errors for missing:author , missing:updated and missing:entry-title fields:


Previously there were as many errors as the items on a single blog page. Today these errors have dropped down by 100% which is indeed a rich improvement in terms of site on-page optimization.
drop in Structured Data errors

Note:
The remaining 11 errors are occurring due to 11 pages on our blog where we have willingly removed the Author names and timestamps because mentioning author name and post time on an advertisement page, Contact Page, Download Page or Category page does not make sense at all. We have therefore not fixed these 11 pages willingly. These 11 errors wont harm us compared to those previous 1168 errors which was a great loss to the site's health.

11 items with errors

Read to try the fix all your Structured Data items with errors?

If your answer is yes then kindly read below the most descriptive tutorial with all answers to your questions:
Troubleshoot Guide
These errors will surely not fix if you are doing one of the followings:
author markup and timestamp
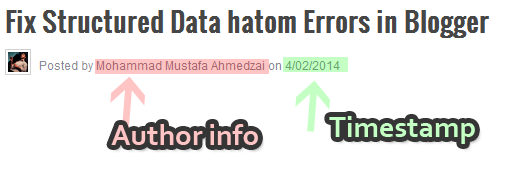
  1. Not displaying author info in Post section causes Missing:author error. i.e. "Not mentioning the author name with class Fn"
  2. Not displaying date or time in Post section causes Missing:Updated error. i.e. "Not mentioning the published time of the post"
  3. You are displaying author info and published time on Homepage but not on subpages
  4. Not adding the class Updated to timestamp.

Posted at Thursday, May 15, 2014 |  by Unknown

Show Random Headlines Inside Sticky Floating Bar


Floating sticky Bars
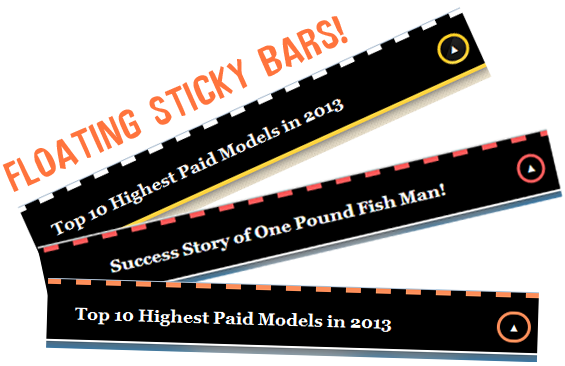
Ever wondered to create a Sticky Floating Bar to show Random headlines on your blog? We recently developed a small plugin in wordpress which we have implemented on our third blog hosted on wordpress and also on BlogSpot blogs of our existing clients. We introduced several versions of sticky bars for blogger blogs in 2012 but this one adds an extra functionality. It will show a random post on each page refresh! It uses Feedburner JavaScript snippet to fetch recent headlines from your Feeds and then displays a title randomly when user refreshes the webpage or navigates between pages. Also contains a toggle button to show and hide the headlines. You can customize it easily and change its location to top of page or at footer. Works best with fluid and responsive designs. The analytics for our newly launched blog has shown an amazing 30% increase in Pageviews just after we installed this plugin. I have developed both static and dynamic versions of it for both Blogger and Wordpress Genesis Framework.


Today's tutorial will guide you in installing this amazing plugin on your blogger blogs to multiply every unique visit. Lets get to work then!
 

Activate Recent Headlines on Feedburner?

Note: For Dynamic version only. If you wish to add a static/manual version of this plugin then skip this step.
For the dynamic version of this plugin you will need to have Feeds stored at feedburner. 
  1. Go To Feedburner > Publicize > BuzzBoost
  2. Uncheck all the boxes. Keep number of items 15 or you can choose All to select all posts have your published so far. Make links open in same window.
  3. Click Save to activate the List of your recent posts.

buzzboost settings
   4. Feedburner will give you a JavaScript code that you will need to copy. Only copy the code starting with <script> and ending with </script> as shown below:
feedburner javascript snippet
  Save this code inside a notepad because we will need to use it later in this tutorial.

Show Random Headlines in blogger  - Dynamic

We managed to write a script with the help of CSSGlobe script which helps you to display content randomly and rotate content using Javasctipt and CSS. We modified it to generate a dynamic list instead of manual list through Feedbuner BuzzBoost Headlines. I guess instead of adding a manual list a random dynamically generated list would be much more useful. :)
You can add the sticky bar at your blog footer and also at the top of your blog. I will guide you with both the settings. Follow these simple tips:
  1. Go to Blogger > Template
  2. Backup your template
  3. Click Edit HTML
  4. Search for </head> and just above it paste this:
<script type='text/javascript'>
//<![CDATA[
this.randomizer = function(){
    var length = $(".feedburnerFeedBlock li").length; // this is where we put the id of the list
    var ran = Math.floor(Math.random()*length) + 1;
    $(".feedburnerFeedBlock li:nth-child(" + ran + ")").show();
};
$(document).ready(function(){  
    randomizer();
});

$(document).ready(function() {
$('#toggleButton').click(function() {
if ($('#MBT-Sticky-container').is(':visible')) {
$(this).val('▼');
} else {
$(this).val('▲');
}
$('#MBT-Sticky-container').slideToggle();
});
});
//]]>
</script>

5.  Optional: Skip this step if you have Jquery source link already added inside your template.
Next search for <head> and just below it paste the following JQuery library code.
<script src='http://ajax.googleapis.com/ajax/libs/jquery/1/jquery.min.js?ver=1.7.2' type='text/javascript'/>
 
6. Search for </b:skin>.  Click the black arrow to expand the code.
compressed blogger stylesheet
   7.  Paste the following CSS Styles just above ]]></b:skin>

/*--------Floating Sticky bar by www.MyBloggerTricks.com --------------*/
#creditfooter{display:none;}
#MBT-Sticky-container {
   height: 55px;
background: #000;
border-top: 5px dashed #FC8D59;
border-bottom: 2px solid #FFFFFF;
position: fixed;
width: 100%;
z-index: 99999;
box-shadow: 1px 2px 9px #666;
top:0px; }
.feedburnerFeedBlock ul, .feedburnerFeedBlock ul li{
    margin:0;
    padding:0;
    list-style:none;
    }
   
    .feedburnerFeedBlock ul li a { color:#fff!important; text-decoration:none;}
        .feedburnerFeedBlock ul li a:hover {text-decoration:underline;}
.feedburnerFeedBlock ul{
    line-height:120%;
   
    }
.feedburnerFeedBlock ul li{
    padding:20px; text-align:center; font-family:georgia; font-size:17px; font-weight:bold;
   
    display:none; /* hide the items at first only to display one with javascript */
    }
#toggleButton {
position: fixed;
top: 19px;
right: 10px;
z-index: 999999999999;
border-radius: 100px;
padding: 5px 6px;
font-size: 10px;
border-width: 3px;
border: 3px solid #FC8D59;
background: #000;
color: #FFF;
cursor: pointer;
}
.sticky-gap {
height: 80px; clear:both;
}

Customization:
[a] Change Colors
  • To edit the border colors of the toggle button and container edit: #FC8D59
[b] Change Location/Position
By Default the sticky bar displays at the top of webpage but if you wish to show rotating random headlines at your website footer then make these changes:
  • Replace top:0px; with bottom:0px;
  • Replace top:19px; with bottom:19px;
[c] To increase or decrease the vertical gap between your content and the sticky bar edit height: 80px;

8. Now finally search for the body tag which is <body>
Note: If you are using Official Blogger Templates then search for this tag instead:
<body expr:class='&quot;loading&quot; + data:blog.mobileClass'>

After you have found the proper body tag simply paste the following code below it:

<input id='toggleButton' type='button' value='▲'/>
<div id='MBT-Sticky-container'>
<script src='http://feeds.feedburner.com/TntByStc?format=sigpro' type='text/javascript'></script>
    </div><div class="sticky-gap"></div>

Replace the above bolded JavaScript code with the BuzzBoost code you copied in this step.
  9.  Save your template and you are all done!
Visit your blog to see an attractive attention grabber working just perfectly! :)

Show Random Headlines in Blogger - Manual

If you wish to display a selected list set of links then you can surely create your own list by making these simple changes.

1. Change the CSS Code:
Inside the CSS code shared above in step#7  replace all .feedburnerFeedBlock ul   with.feedburnerFeedBlock1

2. Change the HTML code
Instead of using the HTML code shared in step#8 kindly use the following one:

<input id='toggleButton' type='button' value='▲'/>
<div id='MBT-Sticky-container'>
<ul class='feedburnerFeedBlock1'>
  <li><a href='ADD URL HERE'>ADD TEXT 1 HERE</a></li>
<li><a href='ADD URL HERE'>ADD TEXT 2 HERE</a></li>
<li><a href='ADD URL HERE'>ADD TEXT 3 HERE</a></li>
<li><a href='ADD URL HERE'>ADD TEXT 4 HERE</a></li>
  
  </ul>
    </div><div class="sticky-gap"></div>

The above code will help you create 4 headlines. You can edit the text and URL address for each link. To create a new headline simply keep on adding the following line:

<li><a href='ADD URL HERE'>ADD TEXT  HERE</a></li>
That's it! 

Posted at Thursday, May 15, 2014 |  by Unknown

Automatically Open all External Links in a New Window in Blogger!

automatically open links in new window

Just today a client requested us that he wish to open all his external links in new window or new tab when clicked and he is not willing to manually do it for each post by adding target="_blank" inside each hyperlink. We wrote down a simple jQuery script that will check all hyperlinks inside your blog pages and will only add the target="_blank"  attribute to links which are external links. It wont  put any effect to internal links of the blog. The script will only detect external hostnames and the moment it finds one, it will insert into the html a target attribute that tells the browser to open the link in a new window. Thus preventing your blog readers from leaving your blog and also helps in increasing your overall pageviews and bounce rate. We thought we shall also share the script with all of you. 

Open all external links in a new tab

Follow these easy steps to add this cool dynamic way of updating all external links.
Note: This method works for both blogger and wordpress blogs, irrespective of platforms.
  1. Go to Blogger > Template
  2. Backup your template
  3. Click "Edit HTML"
  4. Just above </head> paste the following script:
<script src='http://ajax.googleapis.com/ajax/libs/jquery/1/jquery.min.js' type='text/javascript'></script>
<script type='text/javascript'>
$(document).ready(function() { 
  $("a[href^='http://']").each(
    function(){
     if(this.href.indexOf(location.hostname) == -1) {
        $(this).attr('target', '_blank');
      }
    }
  );
$("a[href^='https://']").each(
function(){
if(this.href.indexOf(location.hostname) == -1) {
$(this).attr('target', '_blank');
}
}
);
 
});
</script>
PS: Please do not add the red code if you already have jQuery library source code installed on your blog.
     5. Save your template and you are all done!
Check your blog and click some external links to see it working just fine. :)

How it works? (Optional know-how)

I have added the code twice to check once for links starting with http://  and then for https://. Normally all bloggers blogs have hostnames starting with http://  without the http:// secure protocol. Therefore I added the second instance so that the script may work even for wordpress self hosted blogs.
The yellow highlighted part is where the script scans values inside href attributes and if the value is equal to a negative one (== -1), then this indicates that the hostname is an external domain.
Note: If you equate the href value to a positive one (==1) inside the conditional statement, thenall your internal links will start opening in new windows!
Once the condition is met, the script then inserts a target="_blank" attribute inside the hyperlink tag. That simple!
Hope this script proves helpful for most of you. It is extremely SEO friendly and works fine with all major browsers be it IE, webkit browsers or Mozilla.
Peace and blessings buddies! :)

Posted at Thursday, May 15, 2014 |  by Unknown
Top Ten Things I Hate About Blogger

Blogger

More than a year ago when I started to blog, I hardly found out any other blogging platform then blogger. It was easy to use one could create a blog in about ten or fifteen minutes. Today after working onwordpress and blogger I have realized the pros and cons of both. Following are the ten things I hate about blogger.


1- You Can Not Import Data from Other Blogging Platforms

blogger-to-wordpressBlogger does not allow you to import data from any other blogging platforms like yahoo360, wordpress etc. So you can not switch from other platforms to blogger.
PS: There are applications using which you can import Blogger python scripts to any service you want but that is really time consuming unless a more user friendly way is provided by blogger.

2- Poor SEO

images1In blogger there is no place to add tags to your content while in wordpress you can add relevant tags by which people may search your content.
Adding tags separately deprecates the idea of adding more and more keywords in your content and the blogger can write quality content without having a concern about SEO.


3- Unprofessional Look

BlogSpot blogs look very unprofessional. Wordpress blogs no doubt look a lot more professional and attractive. Moreover I get irritated by with unprofessional widgets on the blog like fish tank.

4- Less Range Of Templates

BloggerTemplates


Blogger templates are not available in a wide varietywhereas other blogging platforms provide a huge amount of templates. Take an example of wordpress,wordpress.org has a huge amount of templates and all of them are available for free.

5- Irritating Navigation Bar on Top

Blogger-Navbar
The blogger Navigation bar on top of blogger blogs looks very unprofessional and irritating. You can remove the Nav bar but many of the people don’t know how to do that.

6- Commenting Back Is Very Typical

blogger comment formCommenting back is really typical. First you choose from a list how you want to comment back, sign-inand then enter the captcha. This is very time consuming. I realize that link love and spamming have become very common but facing such hardships while commenting back stops people from commenting often and draws a line between the author and the reader.


7- Less Range Of Widgets

Blogger Widgets are fewer than those of wordpress. Moreover wordpress has a single sitewordpress.org where you can find all of its plugins whereas you have to search different websites for blogger plugins. Currently there are more than 14475 wordpress plugins available on their site.

8- Blogger Uses HTML and XML

Blogger uses HTML and XML for development excluding JavaScript while wordpress usesHTMLPHP. PHP today is according to me the most powerful programming language in the world because of being open source. Most of the web-development is being done on either PHP or ASP.
You can easily find the difference between a blogger blog and a wordpress blog. Thanks to PHP, wordpress blogs are clean and attractive and give a professional look.

9- Problems While Uploading Data

blogger upload error

Sometimes unusual errors are shown while uploading imagesvideos or even a complete blog post and some times maintenance is going on in blogger. This wastes the precious time of the bloggers.


10- Poor Customer Service

UPDATED:-
It is really difficult to get a solution to a problem from Google employees unless you Google it for hours whilst there are hundreds of developers working day and night to make Wordpress a better platform and their always present when asked for any technical help.

Posted at Thursday, May 15, 2014 |  by Unknown
13 Killer SEO Tips For Beginner Bloggers

13 killer SEO tips

Are you planning to launch a new website or blog, then you must know what the SEO is. SEO stands for Search Engine Optimization which means the process of improving the visibility of a website or a web page in the search engines like Google, Yahoo, Bing etc. via the paid or unpaid means. SEO may target different kinds of search including image search, local search, video search, academic search, news search and many more. You should not be successful in your career if don’t obey SEO plus it is necessary for every webmaster to be listed in top results and directory. Therefore, below I am going to share some tips and tricks which helps you in improving your website/Blog rank in Alexa and Google search.


Top 13 Killer SEO Tips and Tricks

1. Use of proper Meta Tags in your website or Blog
Meta tags is the special HTML tag that provides information about a Web page. Unlike normal HTML tags, meta tags do not affect how the page is displayed. Instead, they provide information such as who created the page, description of the site, rss, what the page is about, and which keywords represent the page's content. Many search engines use this information when building their indices. for example:
<meta name="description" content="Find Quality Widgets For Blogger, Free Blogger Gadgets, Magazine Templates, Learn SEO and Blogging tips." />
2. Use Rich Keywords according to your website niche
Well! keywords are words that are used to reveal the internal structure and niche of the website. We can use as many keywords to describe our website content like to describe Hacking website, we use hack,learn hacking,crack etc. in the meta tags..
3. Social Media
This is very important term in building the good repo in the search engines. Many websites such as Technorati, Digg, Stumbleupon, Facebook, Google Buzz, Twitter, Flickr etc. comes into play to do it. All you have to make an account at that sites and connect your site to them and start uploading articles to have an good increase in ranking.
4. Sharing your site with some Directories
Submit your website link to some directories such as DMoz, Bloggers Directory, Technorati etc.. to start seeing your articles results with them and people can explore it.
5. Internal Linking and External Linking to your website
We should clearly understand the balance of internal and external linking. Hence, we should inter-link website pages to each other to enjoy the flow of Page rank juice and use no follow tag to our external linking.
6. Unique and relevant Content
Google robots love to visit and enjoy unique content in order to serve its users with relevant and quality content. Good quality articles brings you a lot of traffic while posting same articles.
7. Reducing the Bounce rate of your website
Bounce rate means that how much visitors come to your website and skip. To Reduce it, you should follow some tips-
  • Attractive template and design of website
  • Do not make your website a fish of ads and advertisements.
  • Fast loading time is also an another factor.
  • At last, Unique and good quality content.
8. Never rename your webpage name unless your website is new
For established and popular websites, renaming your webpages will kill your rank in the search engines, you are essentially starting from scratch in terms of SEO. So if you are redesigning your site, remember keep the old file names.
9. Link Building is also an another factor
In real, Google and Alexa determines sites repo and rank with the linking of the website with another. You can also buy links with some companies to enjoy good PR.
10. Easy Sharing
This means that you can make videos at YouTube and upload them to bring traffic, join Forums and doing tweetning at twitter and many more sites.
11. Ads and Advertisements
Now you can advertise your website with Google Adwords, Facebook ads etc. on the payment seats to bring more successful traffic and good SEO results to your website.
12. Submit your Website sitemaps to the popular search engines
Hence Sitemaps refers to the list of website posts and articles and submitting that to Google,yahoo,Bing will bring your all posts in search results by scrolling them.
13. Allow Guest Posting and play Contests
Start Guest posting by other people and give them chance to post on your website and enjoy a link to their websites. Also play contests on your website to engage people to take part in it and win prizes.
Note: If you implement of the above tips and tricks in your website, then you will definitely get a Google Page rank and good Alexa rank in short period of time. Thanks!

Posted at Thursday, May 15, 2014 |  by Unknown

Create a Drop Down Menu In Blogger

Update: We have published almost 9 more menus like this one. To get them all just use the search box and type drop down menu. If you wish to add the same menu to Blogger Template Designer templates then read this post -> Custom Drop Down menu 


image
Why do you run after scripts such as jquery while you can use simple CSS and HTML to create beautiful drop down menus for your blog. I already shared a list of 30 Navigation menus and now you need to learn how to create a drop down menu in a navigation. I am sharing a simple code here that can be fully customize to make your preferred changes. So lets get to work!


Live Demo


How To Create a Drop Down Menu?

A drop down menu is needed when you have too much content on your blog or you love keeping things organized. To add a drop down menu to your blogger blogs do this:
  1. Go To Blogger > Design > Page Elements
  2. Select a HTML/JavaScript Widget just under the header and paste the following code inside it,
drop down menu
<div id='mbtnavbar'>
      <ul id='mbtnav'>
        <li>
          <a href='#'>Home</a>
        </li>
        <li>
          <a href='#'>About</a>
       </li>
        <li>
          <a href='#'>Contact</a>
        </li>
  <li>
           <a href='#'>Sitemap</a>
            <ul>
                <li><a href='#'>Sub Page #1</a></li>
                <li><a href='#'>Sub Page #2</a></li>
                <li><a href='#'>Sub Page #3</a></li>
              </ul>

        </li>
      </ul>
    </div>
Replace # with your Page Links and the bolded text with relevant page names. The yellow highlighted code is responsible for the drop down menu. You can copy and paste it under any tab you want just before </li>
To add another tab just paste this code above </ul>
<li>
          <a href='#'>Tab Name</a>
        </li>
       
    3.   Now Go to Design > Edit HTML
    4.   Backup your template and search for ,
]]></b:skin>
     3.   Just above it paste the code below,
/*----- MBT Drop Down Menu ----*/

#mbtnavbar {
    background: #060505;
    width: 960px;
    color: #FFF;
        margin: 0px;
        padding: 0;
        position: relative;
        border-top:0px solid #960100;
        height:35px;
}

#mbtnav {
    margin: 0;
    padding: 0;
}
#mbtnav ul {
    float: left;
    list-style: none;
    margin: 0;
    padding: 0;
}
#mbtnav li {
    list-style: none;
    margin: 0;
    padding: 0;
        border-left:1px solid #333;
        border-right:1px solid #333;
        height:35px;
}
#mbtnav li a, #mbtnav li a:link, #mbtnav li a:visited {
    color: #FFF;
    display: block;
   font:normal 12px Helvetica, sans-serif;    margin: 0;
    padding: 9px 12px 10px 12px;
        text-decoration: none;
       
}
#mbtnav li a:hover, #mbtnav li a:active {
    background: #BF0100;
    color: #FFF;
    display: block;
    text-decoration: none;
        margin: 0;
    padding: 9px 12px 10px 12px;


}
#mbtnav li {
    float: left;
    padding: 0;
}
#mbtnav li ul {
    z-index: 9999;
    position: absolute;
    left: -999em;
    height: auto;
    width: 160px;
    margin: 0;
    padding: 0;
}
#mbtnav li ul a {
    width: 140px;
}
#mbtnav li ul ul {
    margin: -25px 0 0 161px;
}
#mbtnav li:hover ul ul, #mbtnav li:hover ul ul ul, #mbtnav li.sfhover ul ul, #mbtnav li.sfhover ul ul ul {
    left: -999em;
}
#mbtnav li:hover ul, #mbtnav li li:hover ul, #mbtnav li li li:hover ul, #mbtnav li.sfhover ul, #mbtnav li li.sfhover ul, #mbtnav li li li.sfhover ul {
    left: auto;
}
#mbtnav li:hover, #mbtnav li.sfhover {
    position: static;
}
#mbtnav li li a, #mbtnav li li a:link, #mbtnav li li a:visited {
    background: #BF0100;
    width: 120px;
    color: #FFF;
    display: block;
    font:normal 12px Helvetica, sans-serif;
    margin: 0;
    padding: 9px 12px 10px 12px;
        text-decoration: none;
z-index:9999;
border-bottom:1px dotted #333;
   
}
#mbtnav li li a:hover, #mbtnavli li a:active {
    background: #060505;
    color: #FFF;
    display: block;     margin: 0;
    padding: 9px 12px 10px 12px;
        text-decoration: none;
}
Make these changes:
  • Change #060505 to change background color of the Main menu
  • Change  the yellow highlighted text to change font color, size and family
  • Change #BF0100 to change the background of a tab on mouse hover
  • Change #BF0100 to change the background color of the drop down menu
  • Change #060505 to change the background color of drop down menu on mouse hover
      4.    Save your template and you are done!

Visit your Blogs to see a beautiful Navigation menu just below Header. Have Fun! :)
If you have any questions feel free to post them.

Posted at Thursday, May 15, 2014 |  by Unknown

Show Next & Previous Post Titles in Blogger with jQuery Navigation

jquery pager navigation in bloggerYou can see that we have replaced Older/Newer Pagination buttons with Post titles. This trick is not a new one and already many developers proposed different solutions using JavaScript or using jQuery. We will also use jQuery but in a more neater and optimized fashion using jquery to fetch URL parameters instead of running long js queries. Blogger blogs are neither optimized nor structured in a user friendly manner. Same applies to default wordpress themes. The pagination buttons make no sense when placed at the bottom of comments container. Anything that provides usability to readers should be placed straight in front of eyes and not pushed down to the page where one would rarely scroll. After checking our analytics stats, I found thatNext/Previous buttons placed just at the bottom of post body generates more pageviews compared to placing them down below comments section. They become even more useful if instead of showing just buttons pointing to succeeding or preceding posts, show your readers the blog post titles. We will learn today how to create this professional looking pager navigation in blogspot blogs.


  • DEMO: Scroll down to the bottom of this post
Next Previous buttons

Add it to blogger

First we will add the necessary code for the new pagination and then we will remove the existing default buttons that appear below comment section
  1. Go To Blogger > Template
  2. Backup your template
  3. Click "Edit HTML"
  4. Search for ]]></b:skin>

/*################MBT Pager ##########################*/
.mbt-pager { border-top: 2px dashed #ddd; border-bottom: 2px dashed #ddd;  margin-bottom: 10px;   overflow:hidden; padding:0px;}
.mbt-pager li.next { float: right; padding:0px; background:none; margin:0px;}
.mbt-pager li.next a { padding-left: 24px; }
.mbt-pager li.previous { margin:0px -2px 0px 0px; float: left;  border-right:1px solid #ddd; padding:0px; background:none;
}
.mbt-pager li.previous a { padding-right: 24px;  }
.mbt-pager li.next:hover, .mbt-pager li.previous:hover  {background:#333333; }
.mbt-pager li { width: 50%; display: inline; float: left; text-align: center; }
.mbt-pager li a { position: relative; min-height: 77px; display: block; padding: 15px 46px 15px; outline:none; text-decoration:none;}
.mbt-pager li i { color: #ccc; font-size: 18px; }
.mbt-pager li a strong { display: block; font-size: 20px; color: #ccc; letter-spacing: 0.5px; font-weight: bold; text-transform: uppercase; font-family:oswald, sans-serif, arial; margin-bottom:10px;}
.mbt-pager li a span { font-size: 15px; color: #666;  font-family:oswald,Helvetica, arial; margin:0px;}
.mbt-pager li a:hover span,
.mbt-pager li a:hover i { color: #ffffff; }
.mbt-pager li.previous i { float:left; margin-top:15%; margin-left:5%; }
.mbt-pager li.next i { float: right;
margin-top: 15%;
margin-right: 5%; }
.mbt-pager li.next i, .mbt-pager li.previous i ,
.mbt-pager li.next,  .mbt-pager li.previous{
-webkit-transition-property: background color; -webkit-transition-duration: 0.4s; -webkit-transition-timing-function: ease-out;
-moz-transition-property: background color; -moz-transition-duration: 0.4s; -moz-transition-timing-function: ease-out;
-o-transition-property: background color; -o-transition-duration: 0.4s; -o-transition-timing-function: ease-out;
transition-property: background color; transition-duration: 0.4s; transition-timing-function: ease-out; }
.fa-chevron-right {padding-right:0px;}
  • To change the black background and white font color of the selected area on mouse hover edit: background:#333333;    and for font color edit: color: #ffffff;
  • Use our Color generator tool for picking the hexadecimal color code
   5. Now we will add some fancy Google web font called Oswald, so that our widget stands out. Kindly search for <head> and just below it paste the following code:
<script src='http://ajax.googleapis.com/ajax/libs/jquery/1/jquery.min.js' type='text/javascript'/>
<link href='http://fonts.googleapis.com/css?family=Oswald' rel='stylesheet' type='text/css'/>
Note: Remove the bolded code if you have already added jquery library inside your template.
     6. Next we will add the HTML code that will position the pager at the bottom of last paragraph on the blog post. Search for <data:post.body/>
     7. Just below it paste the following HTML code:
<b:if cond='data:blog.pageType == &quot;item&quot;'>
<b:if cond='data:blog.pageType != &quot;static_page&quot;'>
<ul class='mbt-pager'>
        <li class='next'>
<b:if cond='data:newerPageUrl'>
<i class='fa fa-chevron-right'/><a class='newer-link' expr:href='data:newerPageUrl' expr:id='data:widget.instanceId + &quot;_blog-pager-newer-link&quot;' rel='next'/>
<b:else/>
<i class='fa fa-chevron-right'/><a rel='next'><strong>Next</strong> <span>You are viewing Most Recent Post</span></a>
</b:if>
</li>
    <li class='previous'>
<b:if cond='data:olderPageUrl'>
<i class='fa fa-chevron-left'/><a class='older-link' expr:href='data:olderPageUrl' expr:id='data:widget.instanceId + &quot;_blog-pager-older-link&quot;' rel='previous'/>
<b:else/>
<i class='fa fa-chevron-left'/><a rel='previous'><strong>Previous</strong> <span>You are viewing Last Post</span></a>
</b:if>
</li>
    </ul>

<script type='text/javascript'>
//<![CDATA[
(function($){   
    var newerLink = $('a.newer-link');
    var olderLink = $('a.older-link');
    $.get(newerLink.attr('href'), function (data) {
     newerLink.html('<strong>Next</strong> <span>'+$(data).find('.post h3.post-title').text()+'</span>');   
    },"html");
    $.get(olderLink.attr('href'), function (data2) {
     olderLink.html('<strong>Previous</strong> <span>'+$(data2).find('.post h3.post-title').text()+'</span>');   
    },"html");
})(jQuery);
//]]>
</script>
      </b:if></b:if>
Here I used a bit of jquery to fetch the data inside title tags. Since blogger only provides the option to switch between next and previous posts using URLs, therefore we needed jQuery to find the title classes using the heading tags and retrieve the data out of them. The title classes and heading tags may be different for custom blogger templates (you may need my help here by posting your blog urls so that I could tell you the correct title class used inside your blog)
In standard blogger templates the correct class is: .post h3.post-title   and therefore I will be using the same inside the jquery code above.
  • (Optional) The yellow and orange highlighted text can be replaced with any text you like. They will appear when a user is either viewing the most recent post or the last post on the blog.
8. Save your template and you are almost done! Visit your blogs and you will see the pager navigation working just perfectly! :)

Removing existing Next/Previous buttons

Now its time to prevent the default buttons from displaying below comment sections.
  1. Search for  <b:includable id='nextprev'>  
  2. You will see a big chunk of code below it that looks slightly similar to the code below:
<div class='blog-pager' id='blog-pager'>
   <b:if cond='data:newerPageUrl'>
     <span id='blog-pager-newer-link'>
     <a class='blog-pager-newer-link' expr:href='data:newerPageUrl' expr:id='data:widget.instanceId + &quot;_blog-pager-newer-link&quot;' expr:title='data:newerPageTitle'><data:newerPageTitle/></a>
     </span>
   </b:if>
   <b:if cond='data:olderPageUrl'>
     <span id='blog-pager-older-link'>
     <a class='blog-pager-older-link' expr:href='data:olderPageUrl' expr:id='data:widget.instanceId + &quot;_blog-pager-older-link&quot;' expr:title='data:olderPageTitle'><data:olderPageTitle/></a>
     </span>
   </b:if>
   <a class='home-link' expr:href='data:blog.homepageUrl'><data:homeMsg/></a>
   <b:if cond='data:mobileLinkUrl'>
     <div class='blog-mobile-link'>
       <a expr:href='data:mobileLinkUrl'><data:mobileLinkMsg/></a>
     </div>
   </b:if>
</div>
<div class='clear'/> 
  3. All that you need to do is to enclose this code inside conditional codes as shown below:
<b:if cond='data:blog.pageType != &quot;item&quot;'>
<b:if cond='data:blog.pageType != &quot;static_page&quot;'>
THE ABOVE BIG CHUNK CODE IN
</b:if></b:if>
    4. Save your template and you are all done!
Now the default buttons will appear on homepage but not inside posts or static pages. If you wish to permanently delete them, then simply delete the big chunk code above and save your template.

Posted at Thursday, May 15, 2014 |  by Unknown

Ad

Receive all updates via Facebook. Just Click the Like Button Below

?

Dapatkan Widget Ini Di Muhammad Yousaf | Simple SEO Tips @ Blogger Tips

Blogger template. Proudly Powered by Blogger.
back to top